This post may contain affiliate links. As an Amazon Associate I earn from qualifying purchases. Please read our disclosure policy.
Pizza is one of life’s perfect foods and this Weber Pizza is proof of that. No matter the time, place, or cooking device, a delicious pizza can be made. Today we fire up our grill to make a grilled variation a tasty Margherita Style pizza.

Pizza is an old friend of mine and I bet yours, too. At Ramshackle Pantry, we have shared our loved Chicago Deep Dish pizza recipe and a Detroit Style Pizza recipe. We love pizza in all its shapes and forms.
Grilled pizza is no exception and it is always fun to get outside and cook on the grill. So, I am firing up my Weber grill and want to share our great Grilled Margherita Weber Pizza.
Weber Pizza Dough Summary
This pizza is not hard, but it does need a little bit of time. We are not going to be purchasing a pizza dough, but making it from scratch. While I love all parts of a pizza, I think the dough can be the superstar of most pizzas, so we are going to spend a bit of time on it.
I am using a dough recipe that was inspired by this one. It is intended for NY style pizza and I have made some slight modifications in ingredients and in cooking. The dough for this recipe will need a day or two. You could try and hurry it up, but I recommend taking the extra time to let your dough steep in its own pizza dough glory.
Leave Your Pizza Stone Where It Is For This Weber Pizza
This recipe could be cooked with a pizza stone, but I intentionally decided to leave it out. We are grilling, right? I want those grill marks on my pizza! Additionally, it will cut down on the preheat time since pizza stones can take a while to heat up.
Margherita in Spirit
First, to be clear, what we are going to make is not strictly a Margherita pizza. A traditional Margherita pizza is of a Neapolitan style which is cooked in a fairly specific way. The European Union actually has some very specific definitions of how it is to be prepared and served.
We are not following those guidelines. First, we are not using San Marzano tomatoes. Second, our dough is a take on a New York Style pizza and we will be cooking it slower and at lower temps than the 1000° Fahrenheit that some Neapolitans are cooked. We will be cooking ours at a modest 325° Fahrenheit.
This Dough Recipe Makes TWO pizzas
While the dough we make will make two pizzas, I am only going to be making ONE pizza. Then, I wrap up the other dough ball and put it in the freezer for future use. While the dough ingredients will have listings for two pizzas, we will only be making one complete pizza. Each pizza will serve two people.
Past Problems with Grilled Pizza
One of the first things I tried to cook in my Weber was a traditional Neapolitan Margherita pizza. A great thing about this model (Genesis III) is that it can get pretty hot. Much hotter than my oven can, so I was very excited to up my pizza game on my Weber. Unfortunately, I learned some lessons very fast.
The big problem I found is that I could get my temps up really high, but only on the bottom. Even with barely any ingredients, I would end up with a burnt bottom and cheese that was still not melted on top. Now, there ARE solutions to this. There are several different kinds of attachments that a person can hook up to their kettle grill that provides more even radiant heat. There are also many DIY tricks I found that would involve a second pizza stone that stood on top of the pizza.
I just am not interested in diving that deep into a pizza hack. I think I would consider trying to create a backyard pizza oven before I messed around too much with that.
Exact Measurements On The Dough
One thing that I have learned with pizza dough (or really any baking) is that measurements matter! I tend to get burned (see what I did there), whenever I work with recipes involving dough that need a rise, but that are not measured out exactly.
So, for this recipe, I measure dough ingredients exactly. Perhaps a person can get away with not measuring exactly on some of the more sweet dishes, but for this Weber pizza and really any bread related recipe, I measure.
Metal Pizza Peels are Awesome
If you look at my feature photos and some of the better-curated photos, you will see a wood pizza peel. In the past, a problem I have encountered is having my pizza stick to the pizza peel while slipping it to the cooking instrument. This isn’t just a grilling problem, but a pizza problem. Sure, I have tried adding cornmeal and extra flour to the peel… I still do that. A metal pizza peel is superior.
When dealing with the raw dough, just make sure your pizza can slide off the peel. Make sure to keep the peel dry and sometimes I just slip the dough around the peel. Granted, since we are not adding ingredients before it is added to the peel, it is not quite as much of a problem, but just be warned that this could be an issue and to be careful.
Simple Pizza Sauce for Weber Pizza
Alright, I am not making our sauce from scratch, but this simple sauce recipe is tasty, simple, and will add a tad of that homemade feel. A little olive oil, fresh garlic, onions, fresh thyme, some tomato sauce, and a little tomato paste.
Add the oil, garlic, and thyme to a medium saucepan at lower temps for a while. Just enough to glass over the garlic and not burn the fresh thyme. Then, add all the other ingredients and allow it to simmer for a while.


Stretching the Dough
Here is a great technique for stretching your dough. It may sound a little cheesy (see what I did there), but the guy is right that you have to feel out your dough ball and let it guide you. If you start roughhousing with your dough, you can make a crust that is too dense. If you don’t take care of it enough, your pizza will not be big enough around.


Cooking The Dough
Probably the one thing that I changed in my pizza making for this Weber Pizza is how I actually bake the dough. I do not place the entire ready-to-bake pizza on the grill at once. Instead, I allow the dough to cook alone on the grill for a bit. Then, I flip the dough for a few more minutes. Finally, I flip it back and add all the toppings.
So, one thing to keep in mind is to have your toppings ready by the grill before you start baking the dough.


Time Needed In Cooking
Once the pizza is on the grill, you will need about 20 to 30 minutes for it to cook. Approximately 10 minutes of the dough cooking on the grill by itself and then another 10 to 20 with the toppings on it.
While cooking, you should keep an eye on everything. There is a little bit of feel that will need to go into this. There are no ingredients that are unsafe to eat if not cooked well enough, but to provide maximum flavor and texture, you want to make sure things are cooked just the right amount. If the middle of your dough, during the dough cooking phase, is starting to look too brown, perhaps it is time to flip it or put the ingredients on.
I really have learned quite a bit during this grilling series and one of the things I am happiest with is getting this Margherita Weber Pizza down. If you like what we are doing here, please subscribe to get updates via email or follow me on Instagram!
Products I used in this recipe
Grilled Pizza Recipe Tips
- Pizza Dough Inspired By This Recipe
- Dough Stretching
- The Dough makes for TWO pizza balls, but we only make one pizza for this recipe and then freeze the other. Allow for an extra 2 hours for dethaw when using the second ball.

Did You Make This Recipe?
I am so glad you tried our grilled Weber Pizza and I would love to hear how it went in the comments section below. If you did try it, a rating would be greatly appreciated and we would love for you to share it on your favorite social media platforms. Most of all, thanks for visiting Ramshackle Pantry and I hope you continue visiting and making our recipes!
Print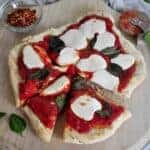
Weber Pizza Margherita Style
- Prep Time: 27 hours
- Cook Time: 20 Minutes
- Total Time: 27 hours 20 minutes
- Yield: 4 Slices 1x
- Category: Dinner
- Method: Grilling
- Cuisine: Italian
Description
This Weber Pizza is a tasty way to experience Margherita flavors on your grill. With fresh mozzarella, basil, and some easy pizza sauce, this grilled pizza is a winner
Ingredients
For The Pizza Dough (makes 2 balls)
- 190 grams lukewarm water
- 4 grams granulated sugar
- 1 packet (7g) Active Dry Yeast
- 311 grams Bread Flour (I use Dakota Maid)
- 10 grams olive oil
- 5 grams salt
The Sauce
- 2 Tablespoons of Olive Oil
- 2 Minced Garlic Cloves
- 2 Tablespoons of Minced Onion
- 1 Tablespoon Fresh Thyme
- 8 Ounce Can Tomato Sauce
- 2 Tablespoons Tomato Paste
Toppings
- 8 Ounce ball of Fresh Mozzarella Cheese
- 10–15 fresh basil leaves
Instructions
- Either 1 or 2 days before making pizza, add lukewarm water and sugar to a mixing bowl
- Sprinkle yeast on top.
- Allow to sit for 5 minutes
- Add all ingredients to mixing bowl and manually stir until everything is incorporated.
- Knead by machine (or hand) until the dough is smooth. In my KitchenAid, this was approximately 5 minutes.
- Make sure it is a ball and lightly coat with oil.
- Place in a covered dish for 1-2 days.
- 3 hours before you intend on baking, take out of the refrigerator.
- Divide into two equal pizza balls. We will only be using one today. For the other, I wrap it in a freezer bag and put in a freezer.
- For the pizza ball we are using, I allowed to rise in my oven with it off, but the oven light on.
- Now, for the sauce. Add oil, thyme, onions, and garlic to a medium saucepan over medium-low heat.
- Allow garlic to soften, but nothing to burn. Turn temp down if anything starts to brown.
- Once garlic is softened and glassy, add tomato sauce and paste.
- Preheat your grill to 325° Fahrenheit or as close as you can get it. It should not be a high temp.
- Stretch the dough as instructed in the notes.
- Once dough is stretched, add to preheated grill and close cover.
- Cook for 5 minutes.
- Flip and allow to cook for five more minutes with the cover on, but watch to make sure nothing is burning.
- Flip, add sauce first, then cheese and basil leaves.
- Allow to cook covered until cheese is melted, but the crust is not burned. Should be 10-20 minutes.
Notes
- Pizza Dough Inspired By This Recipe
- Dough Stretching
- The Dough makes for TWO pizza balls, but we only make one pizza for this recipe and then freeze the other. Allow for an extra 2 hours for dethaw when using the second ball.


I put this on the grill and it turned out pretty dang good. Thanks for sharing.