This post may contain affiliate links. As an Amazon Associate I earn from qualifying purchases. Please read our disclosure policy.
Spring is just starting to sprout here in the upper Midwest, which means that rhubarb will start popping up in our gardens. Rhubarb season also means rhubarb dessert season and is one of my favorite times of the year.
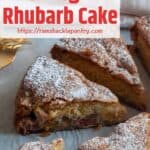
This Norwegian Rhubarb Cake is a delightful treat that is a great dessert and a great way to share your rhubarb. Known as Rabarbrakake in Norway, this rhubarb cake should be enjoyed by the entire globe.

Such a simple cake, but it has so much delicious flavor. This is a lovely, simple cake with an occasional bite of tangy fresh rhubarb. Don’t worry about our Rabarbrake tasting too tart, as there is plenty of sugar to balance this cake. The steps to baking our cake are simple, making it great!
What makes it special, however, is the combination of great flavor, seasonal rhubarb, and a chance to enjoy a Norwegian heritage recipe.
This would be an excellent dessert for a Spring cookout with main meals like Grilled Bacon Wrapped Shrimp, Grilled Chicken Legs with Yogurt Mint Marinade, or BBQ Spatchcock Grilled Chicken. If you are looking for a different rhubarb recipe, check out this perfect Rhubarb Pie. No matter what you make, make sure to treat yourself!
🍰 Ingredients
Rhubarb is the star of this cake, but it takes more to really pull this together. Here is what you will need to make this:
- Sugar
- Eggs
- Vegetable oil or neutral oil
- Milk
- Rhubarb
- Baking powder
- Salt
- All-purpose flour
- Shortening
- Butter
- Powdered sugar (optional)
See the recipe card for quantities.
🍲 Instructions
First, we whip our egg whites. This adds texture to our cake and also helps the cake rise during the baking process.
Eggs are a wonderful thing to have in the kitchen, and I always love to watch my KitchenAid work magic by whipping those whites. While the whites are whipping, mix the rest of the batter up.
This is just a matter of putting our wet ingredients in a bowl and whisking them together. Then we add half of our rhubarb and blend it right in. Mix in our dry ingredients to make a nice flour mixture turned to batter.
Once the egg whites have formed firm peaks, fold them into the rest of the batter and gently mix them until well combined. This may take a minute or two. The mixture should look homogenous, without egg whites’ white streaks.
After mixing it, we add it to our cake pan and top it with rhubarb, sugar, and butter. Then, we cook it! As far as baking goes, this is a simple recipe with just a few steps. Outside of whipping the egg whites, this rhubarb cake is just a matter of dumping, mixing, sprinkling, and baking.
We love our Norwegian recipes here at Ramshackle Pantry. You can check them out on our Classic Norwegian page, where we have desserts, sides, and meals that all have Norwegian origin.


Whipping Egg Whites
If you have never whipped egg whites, it is an easy process, and you watch the magic of food science work right before your eyes. This is as simple as getting out your stand mixer and putting it on high for a few minutes.
Here is an egg-whipping video that explains the process well. We want to end up with firm peaks on the medium end of stiffness.
Can I Whip Egg Whites By Hand
I am lucky enough to have a nice KitchenAid [Affiliate Link], and I cannot recommend it enough, but you can do this by hand. People did bake things by hand before electricity, right? The difference is the amount of time and effort.
What takes just a few minutes in the stand mixer might take 10 minutes of vigorous whipping by hand. I recommend you watch the video I linked above to understand firm peaks.
When is my cake done?
I suggest baking this cake for 45 minutes and then performing the toothpick test. If you are unfamiliar with the toothpick test, it is a simple way to check and make sure all of the insides of that yummy cake are appropriately finished.
The toothpick test is completed by opening that oven and picking up a clean, dry toothpick. Stick that toothpick straight down into the center of the cake and lift it back up.
Take a look at the toothpick. If there are no cake bits, batter, or remnants, your cake is done.
If, however, it does not come out clean, it means your cake needs more time. At 45 minutes, I suggest baking for another 5 minutes and doing the same thing again. Repeat until this dang cake is done.
Do I need a springform pan?
No, you don’t. You can use a normal 9-inch cake pan. The spring pans are nice; with one little click, you can release the edges and see the cake in all its glory.
You might have a little trouble seeing the cake in its entirety and making nice, well-formed cake pieces with a regular cake pan. If you don’t have a springform pan [Affiliate Link], now might be a good time to pick one up.
Don’t let not having a springform pan stop you from making this. This is a great cake, and a springform pan isn’t going to help this taste better, but maybe (and it is a big maybe) look a little better. Cake is good, right? It doesn’t need help, and it certainly doesn’t need a springform pan to taste good.
🤷 Substitutions and variations
As this is a baked cake, I don’t recommend changing this recipe up too much, but there are a few things you can do to make this your own.
- Rhubarb – Feel free to use a little more or less rhubarb.
- Milk – I use whole milk, but 2% or heavy cream could also be used with varying results.
- Topping – A simple sprinkling the top of the cake with powdered sugar is great, but ice cream or whipped cream is great for this cake.
📦 Storage
Once it has cooled, you can cover it with plastic wrap or aluminum foil and store it in the refrigerator for up to three days. If you want to keep it for longer, you can freeze it.
To freeze the cake, wrap it tightly in plastic wrap and then in aluminum foil. It should keep well in the freezer for up to three months. When ready to eat the cake, let it thaw in the refrigerator overnight. Then, bring it to room temperature before serving.
🎓 History tidbit
Rhubarb has been cultivated in Europe for centuries and quickly became popular in the kitchen. It had become a popular ingredient in both savory recipes and sweet desserts.
Rhubarb is not native to Norway, but it was likely introduced to the country by traders who brought the plant to Europe from China. From there, it quickly spread throughout Europe and eventually reached Norway.
❓ FAQ
Yes, rhubarb is safe to eat, but it’s important to note that only the stalks of the plant are edible. The leaves contain a toxic compound called oxalic acid and should never be consumed.
To prevent rhubarb from getting stringy, slice it against the grain. This means cutting it perpendicular to the long fibers that run down the length of the stalk.
Yes, you can freeze rhubarb. To freeze it, first, wash the stalks and trim off the ends. Then, slice the stalks into 1/2-inch pieces and spread them in a single layer on a baking sheet. Place the sheet in the freezer and freeze the rhubarb until it’s solid. Once frozen, transfer the rhubarb to a freezer-safe container and store it in the freezer for up to six months.
📝 Tips and tricks
- You can eat this cake alone, but we like to serve it heated up with a little vanilla ice cream. Yum. A simple scoop of vanilla ice cream on a warmed-up cake makes this a perfect treat. Of course, you could go for some whipped cream instead, but I am a sucker for a great scoop of ice cream.
- Use a springform pan[Affiliate Link]. While this isn’t 100% necessary, it makes cake making easier.
- Employ the toothpick test. The toothpick test is done by placing a dry toothpick straight down into a baking cake that you think might be done. Your cake should be done if the toothpick is free from any cake bits or cake batter when you pull it out. If there are still little tidbits on the toothpick, you know it needs more time. Bake it for another 5 minutes and try again.
- You can whip your eggs by hand, but a stand mixer makes it much easier.

🛠 Products used in this recipe
😋 Did you make this recipe?
That is awesome, and thank you so much for trying this Norwegian Rhubarb cake recipe. It would be greatly appreciated if you could leave a rating in the comment area below. This lets me know how I am doing and helps others decide if they want to make this recipe. Most of all, thanks for visiting Ramshackle Pantry.

Norwegian Rhubarb Cake
- Prep Time: 15 minutes
- Cook Time: 50 minutes
- Total Time: 1 hour 5 minutes
- Yield: 1 cake, 8 slices 1x
- Category: Dessert
- Method: Bake
- Cuisine: Norwegian
Description
A Traditional Norwegian Rhubarb Cake that celebrates and features a Springtime favorite… rhubarb. It is going to start coming up and when it does, you know there will be plenty. This cake. also known as Rabarbrakake, is a great way to enjoy rhubarb and traditional heritage cooking.
Ingredients
- 2/3 cup sugar
- 3 eggs, separated
- 1/2 cup vegetable or neutral oil
- 1/4 cup milk
- 3 cups rhubarb, chopped
- 1 teaspoon baking powder
- 1 teaspoon salt
- 1 cup all-purpose flour
- 1 teaspoon shortening
- 1/3 cup sugar
- 1/3 cup butter, chopped
- powdered sugar to top (optional)
Instructions
-
Preheat oven to 350° Fahrenheight
- In stand mixer, whip egg whites to firm peaks
- In separate large bowl, mix egg yolks, oil, milk, and mix with whisk.
- Add in 1 ½ cups of chopped rhubarb to the batter.
- Using an immersion blender, blend the rhubarb and batter mixture until incorporated into liquid.
- Whisk in sugar, baking powder, and salt.
- Add flour ¼ cups at a time and mix well.
- Fold in egg whites and gently mix.
- Place a sheet of parchment paper in the bottom of your springpan if yours tends to leak. This helps seal the spring pan. (optional)
- Lightly coat cake spring with shortening
- Pour batter into springform container
- Add rhubarb uniformly and allow to sit on top.
- Sprinkle sugar over the top evenly
- Evenly spread butter over top.
- Bake 45 minutes
- Use a toothpick and place directly in center. If it comes out clean, remove. If not, bake for 5 more minutes and try again. Repeat until done
- Once done, cool for at least two hours
- Sprinkle with powdered sugar and serve.
Notes
- Use a springform pan. While this isn’t 100% necessary, it does make cake making a bit easier.
- Employ the toothpick test. The toothpick test is done by placing a dry toothpick straight down into a cooking cake. If the toothpick is free from any cake bits or cake batter when you pull it out, your cake should be done. If there are still little tidbits on the toothpick, you know it needs more time. Bake it another 5 minutes and try again.
- You can whip your eggs by hand, but a stand mixer makes it so much easier.
Nutrition
- Serving Size: 1/8 of cake
- Calories: 385
- Sugar: 26 g
- Sodium: 384 mg
- Fat: 25 g
- Saturated Fat: 8 g
- Unsaturated Fat: 15 g
- Trans Fat: 0 g
- Carbohydrates: 39 g
- Fiber: 1 g
- Protein: 4 g
- Cholesterol: 90 mg


Well, at least in the kitchen, this was my first foray into Norway…. shaddup!
Anyway, I enjoy discovering new cuisines from around the world to try. This is either through finding a restaurant (in which I tried a Norway-inspired restaurant many years back now in my hometown) or by cooking a dish from it in the kitchen; a lot like Pokémon, I have to catch them all (and there’s only 151 of those creatures, mkay). Even if the cuisine does not have the most glamorous reputation, it will still be given a fair go by me – and those Nodric countries are a primary example of that. When trying out another recipe from this website, I had this recipe stowed away for the right opportunity.
And that opportunity came about with an opening, where on the day of the evening I would be doing some volunteer work, I did not have to go to the farm. That meant the day was free, and I could bake up another dessert for after the meeting, and it just so happened to be when rhubarb season was in bloom. It also helped to be left-field, keeping my trend of always surprising alive.
This cake was another surefire winner. Rhubarb’s less-sweet and more tart flavour gave it a slight edge, which went well with the brown butter finish during baking. The difficulty was slightly ramped up from the previous outings; getting those egg whites to stiff peaks was a new one on me, only expanding the repertoire more. Other than that, it was solid and had a good, robust texture. It was filling with a small slice, and I have eight happy campers giving their approval to it.
The Nordics and Scandinavia might not be on the radar for many people’s favourites, but as far as a good sweet that goes well with coffee – they got their place, and in many ways it is the place to be. And keeping it simple is the only way it should be, to let that coffee be just as good.
How much sugar should go on top? I put the 1/3 cup in the batter but guessed for the top.
I have frozen rhubarb. Do I thaw it or leave frozen?
Hey Cheri, thanks for checking the recipe out. Thaw and drain it.
Can you use frozen rhubarb?
Yes, I would thaw and drain before.
I got a huge bag of rhubarb from a friend and looked up rhubarb cake on Pinterest and found this recipe. It’s easy, it’s delicious and it’s from Norway, which is part of my heritage! I’d call that a win/win/win!
So glad you liked it! Same reasons I like it. 🙂
What temperature do you bake this cake? Did I miss this information?
350° Fahrenheit